Archive for category Preserving & Canning
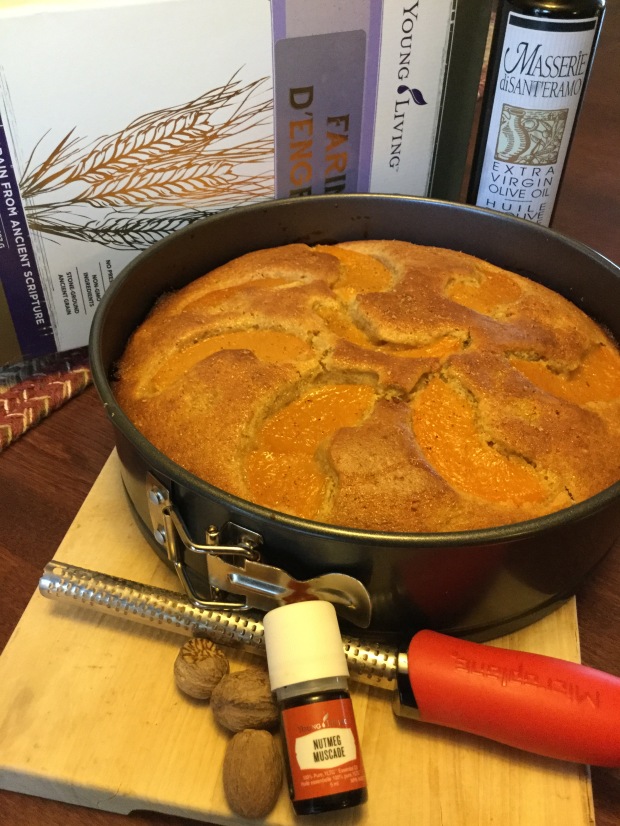
Einkorn Almond Cake with Peaches & Nutmeg
Posted by Diana E. Natalie Johnson in Baking, Dairy Free, Delightful Desserts, Gluten Free Baking, Nutritious Treats & Snacks, Preserving & Canning, Transition Baking on February 27, 2017
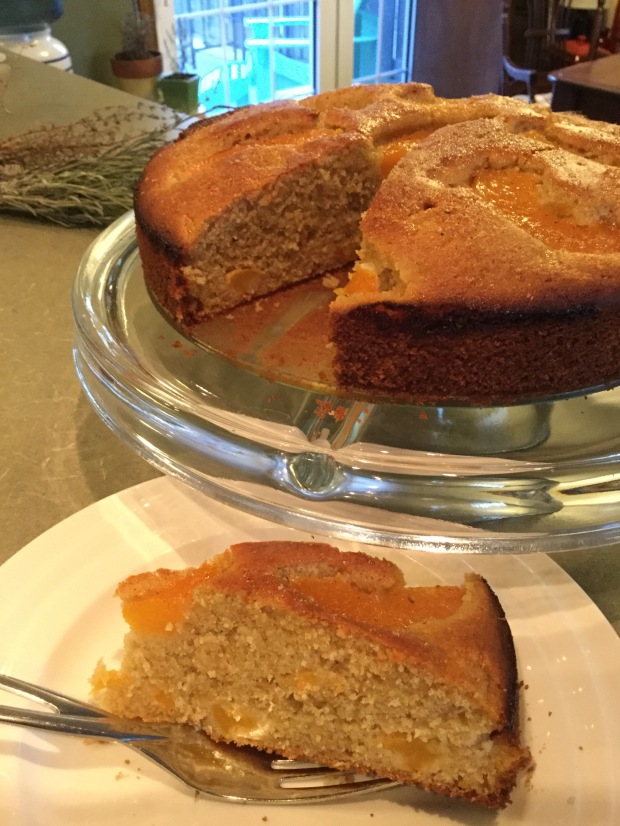
This low sugar, dairy-free, olive oil cake (see recipe below), is an untraditional ‘right-side-up’ take on the Italian dessert recipe that is normally baked upside down and then flipped. Moist and flavourful, it showcases peach, nutmeg, and ground almond meal or ‘almond flour’ along with the beautifully light, nutritious flour milled by Young Living from the ‘original wheat’ known as Einkorn. The cake is simple to make once you acquire your Einkorn flour which is completely non-hybridized and non-GMO, making it very low gluten and more compatible with the human body than modern hybridized wheat.
Today, on the Young Living Farm in Simiane-la-Rotonde France, Gary Young is planting nonhybridized Einkorn seed and then harvesting it the old fashioned way by letting the cut stalks stand in the field for 7 to 10 days to allow the germination process to start before threshing.
💚 Einkorn is the original “staff-of-life” grain, known as the oldest variety of wheat, and believed to be one of the first cultivated foods. When Gary Young began searching for this ancient grain back in 1990…he discovered small patches growing in Hunzaland, in remote areas of Turkey, and eventually on the east bank of the Jordan River Valley…
Gary Young and French Lavender-grower Jean-Noel Landel, were able to plant seed for testing, and produce enough each year to where Gary was able to also plant 150 acres of Einkorn at the Young Living Utah farm in 2012.
🌱
🌱
Hybridized wheat with its 42 chromosomes creates different genetic codes for new proteins that man was never meant to consume. It is the hybridized wheat genome that is the source of gluten-triggered responses.
Because Einkorn is completely NON-GMO, having the simplest genetic code of all varieties of wheat, with just 1 genome and 14 chromosomes, it is easy for the human body to utilize.
Einkorn’s natural genetic code and low gluten levels make it more compatible with the human body than modern, hybridized wheat. This makes einkorn grain easier to digest, so that nutrients are better absorbed.
Many nutrients are also more abundant in Einkorn grain than in modern wheat.
Gary’s TrueGrit™ Einkorn Rotini pasta, for example, is made
of highly nutritious, unhybridized stone-ground Einkorn flour grown in France by artisan farmers.You will see the following Einkorn products available from Young Living Canada:
~ Gary’s True Grit Einkorn Flour
~ Gary’s True Grit Einkorn Pancake & Waffle Mix
~ Gary’s True Grit Einkorn Spaghetti, and Rotini Pastas
To order Einkorn products as well as the Nutmeg essential oil used in this recipe at wholesale member pricing, having them delivered to your door ~ CLICK HERE and follow the prompts to set up your Young Living member account.
Einkorn Almond Cake with Peaches and Nutmeg
INGREDIENTS:
Dry:
1 1/2 cups Young Living Einkorn Flour
1 cup finely ground almond meal (i.e. ‘almond flour’)
1/3 cup unbleached Florida organic sugar available at your local health food or bulk store
1 1/2 teaspoons baking powder
1/2 teaspoon freshly grated nutmeg (or fresh ground nutmeg)
1/2 teaspoon pink salt or sea salt
_____
Wet:
2 large eggs
3/4 cup quality extra virgin olive oil
1/2 cup organic unsweetened almond milk + 1 Tablespoon for glaze
1/2 teaspoon pure almond extract
1 drop Young Living Nutmeg essential oil
1 jar sliced peaches (unsweetened or in light syrup) drained and diced *Reserve 8 intact peach slices for cake top, as well as 1 Tablespoon of peach juice/syrup for glaze
_____
Glaze:
1 Tablespoon honey
1 Tablespoon peach juice/syrup
1 Tablespoon almond milk
METHOD:
Preheat oven to 350 F.
Grease a 9 inch springform cake pan with a little olive oil
In a medium bowl combine flours, baking powder, sugar, nutmeg, and salt.
In stand mixer or by hand in mixing bowl beat or whisk together your eggs, olive oil, almond milk, almond extract, and Nutmeg essential oil.
Mix in the dry ingredients, and fold in the peaches you diced up (saving 8 slices for top).
Pour batter into prepared springform cake pan.
Place reserved peach slices around top of cake.
Whisk the honey, peach juice, and almond milk together in a small bowl, and brush over top of cake and peach slices.
Place into pre-heated oven and bake for 50 minutes or until wooden pick comes out clean.
Cool for a half hour before running a knife around the edge and removing from pan.
Serve when cooled or wrap and store for up to one week.
with joy over a shift to more health-full ingredients,
Diana E. Natalie
Grandma’s Mustard Bean Pickle
Posted by Diana E. Natalie Johnson in Appetizers, Dairy Free, Preserving & Canning on September 9, 2013

There was always a fancy crystal dish on my Grandma’s dining table filled with one of my favourite flavours of the past…Mustard Bean Pickles. Bright yellow mustardy sweetness.
I can’t remember if hers had flecks of red pepper throughout, or not, but in attempting to replicate her recipe (without her recipe to go on!) I decided to add some red pepper any way. I’m sure it added some flavour but mostly it makes it look pretty in the glass canning jars.
I also decided to use white wine vinegar rather than distilled spirit vinegar (regular white vinegar), because it was available to me, and I also believe it to be milder and thus gentler on the taste buds.
EQUIPMENT You will need eight to ten clean 8oz. canning jars with two-piece lids, and a large pot or pan to simmer jars & lids in water prior to canning. You will also need a large (approx. 8 litre) pot for boiling the vegetables, and a smaller stainless steel heavy bottomed pot to cook the sauce in. You will need a wooden spoon or spurtle, a ladle (preferably with a spout), a canning funnel (fits into tops of jars for filling) and canning tools for lifting hot jars and twisting lids on tightly (available in the kitchen section of your local hardware store).
Wash and rinse jars and lids; place them into a large pot or pan and bring to boil, turn down heat to low and let stand in hot water while you are preparing the bean pickles.
INGREDIENTS:
16 cups fresh yellow beans
3 cups sweet onion diced
Sea Salt
3 cups red bell pepper finely chopped, or diced
3 cups sugar (i used 1 1/2 cups white sugar, and 1 1/2 cups organic florida sugar available at your local bulk food store).
1/4 cup all-purpose flour
2 Tablespoons modified corn starch (available at your local bulk food store so you don’t have to buy a whole package)
1/2 cup dry mustard
1 teaspoon yellow mustard seed
1 teaspoon celery seed
1 Tablespoon turmeric
2 Tablespoons pickling salt
1/2 cup water
2 1/2 cups white wine vinegar
[Note: the pickling salt, and the spices listed above are all available at your local bulk food store, so you don’t have to go out and buy whole packages when you only need a little bit to make your bean pickles.]
METHOD:
1. Fill your 8 litre heavy bottomed pot 1/3 to 1/2 full with water , add sea salt to the water (until it tastes like sea water) and bring to a boil.
2. Wash beans, picking out any “duds”, and cut into 1/4 inch pieces with a sharp knife. Place into pot of water.
3. Wash, seed, and chop the red bell pepper, and add to the pot with the beans. Boil the beans and peppers until just tender.
4. In a separate (smaller) stainless steel heavy bottomed pot, combine sugar, flour, modified corn starch, spices (mustard, mustard seed, celery seed, and turmeric), pickling salt, water, and white wine vinegar. Whisk together. Add chopped onion and red bell pepper. Bring sauce to a boil over medium heat, stirring frequently to dissolve sugar and salt. Reduce heat and boil gently until onions become translucent and mixture thickens somewhat, about 5 minutes.
5. Drain beans in a large colander. Return beans to big pot and pour the sauce over the beans. Return to a boil, then shut off heat.
6. Ladle bean mixture into hot sterilized jars one at a time. Wipe rim clean with paper towel. Center lids on jar and screw rim down tight. Lids will suction down on jars as they cool. You will hear the popping sound as this is happening.

NOTE: If for some reason the lids do not seal down (because they are reused older lids that are wearing out, or for some other reason) you will be able to tell by depressing the lid center with your finger. If any jar does not seal down, just keep it in the fridge and use it first. The sealed jars will not need refrigeration. It is not very common for jars not to seal properly.
with joy over revisiting old recipes and favourite flavours of the past,
Diana E. Natalie

PEAR GINGER JAM with Xylitol
Posted by Diana E. Natalie Johnson in Preserving & Canning on August 27, 2012
First, a Wikipedia word about Xylitol. Xylitol is found in the fibres of many fruits and vegetables, and can be extracted from various berries, oats, and mushrooms, as well as fibrous material such as corn husks, sugar cane bagasse, and birch.

Xylitol also has potential as a treatment for osteoporosis, improving bone density. Studies have shown Xylitol chewing gum can help prevent ear and upper respiratory infections. A recent report suggests consumption of Xylitol may help control oral infections of Candida yeast.
Using Xylitol in Jams & Preserves:
When used with a ‘universal pectin’ (activated by calcium rather than sugar) which gels with low amounts of any sweetener, Xylitol works very well in place of sugar for jam making and preserving. Great for Diabetics or those desiring jams and preserves that are low on the Glycemic Index!
PEAR GINGER JAM with Xylitol and Pomona’s Universal Pectin

EQUIPMENT
You will need eight clean 8oz. canning jars with two-piece lids, and a large pot or pan to simmer jars & lids in water prior to canning. You will also need a 4 litre pot for boiling the fruit, a wooden spoon or spurtle, a ladle (preferably with a spout), a canning funnel (fits into tops of jars for filling) and canning tools for lifting hot jars and twisting lids on tightly (available in the kitchen section of your local hardware store). You will need a way to mash or puree the fruit, such as a manual Potato Ricer (pictured in photo above), or a blender, or food processor. I prefer the consistency of the jam when the pears are pushed through a potato ricer (it’s like a giant garlic press).

INGREDIENTS:
8 cups mashed pear fruit
1/4 cup finely chopped crystallized ginger
1/2 cup lemon juice
1/2 teaspoon ascorbic acid or calcium ascorbate (vitamin C powder) – optional.
1 1/2 cups Xylitol
8 teaspoons Calcium water (powder comes with Pomona’s Pectin)
6 teaspoons Pomona’s Universal Pectin powder

METHOD:
Wash and rinse jars and lids; bring to boil, turn down heat to low and let stand in hot water.
Make Calcium Water. (Put 1/2 teaspoon white calcium powder from small packet in Pomona’s Box, and 1/2 cup water into a small clear jar with lid, and shake well.) Set aside.
Wash and prepare fruit. (Peal & quarter the pears, removing core, and cut up into potato ricer, blender, or food processor.)
Process fruit (mash through potato ricer, or whirl in blender or food processor) adding the lemon juice, and ascorbic acid (optional) as you go (prevents oxidation / browning of fruit) into a large glass measuring cup or bowl until you have 8 cups of mashed fruit.
Stir in the finely chopped Crystalized Ginger.
Stir in the 8 teaspoons of pre-made Calcium water.
Measure Xylitol into a separate bowl. Thoroughly mix in the 6 teaspoons of Pomona’s Universal Pectin powder into the Xylitol.
Place the mashed fruit & ginger into a 4 litre pot and bring to a boil.
Add Xylitol-pectin mixture slowly while stirring vigorously 1 – 2 minutes while cooking to dissolve the pectin.
Return to a boil, continue stirring, and when you see foaming around the edges of the pot, remove from heat and drop a spoonful onto a plate and set in refrigerator for one minute to see if it gels alright. If not, continue to boil jam for another couple of minutes until it is ‘set’. (See photo below showing consistency of ‘set’ jam.) Remove from heat and get ready to fill jars.

Fill clean hot jars to 1/8 ” from top using canning funnel and spouted ladle. Wipe rims clean with damp cloth or paper towel.
Screw on two-piece canning lids and tighten. Set jars aside to cool on wooden cutting board or tea towel. You will hear popping sound as lids are sucked down as jam cools. After a few hours check seals to be sure all lids are sucked down.
Store sealed jars in a cool dry place, and refrigerate once open.
THIS ‘double recipe’ FILLS 8 eight oz. canning jars.

Green Tomato & Apple, Pie Filling
Posted by Diana E. Natalie Johnson in Preserving & Canning on August 9, 2012
 [notice I didn’t use the word ‘mince meat’ in the title? Indeed it is a remix of Grandma’s recipe ~ It has nothing to do with meat, but everything to do with old fashioned good taste!]
INGREDIENTS:
- 3 quarts chopped green tomatoes
- 1 1/2 quarts peeled, chopped tart apples
- 2 cups raisins
- 1 cup dried currants
- 1/2 cup diced candied citron, lemon or orange peel
- 2 teaspoons ground cinnamon
- 1/4 teaspoon ground allspice
- 1/4 teaspoon ground cloves
- 1 1/2 to 2 teaspoons salt
- 3 cups brown sugar, OR Sucanat* OR Coconut Sugar**
- 3/4 cup Apple Cider Vinegar
- 1/4 cup lemon juice
*Sucanat = unrefined natural organic sugar cane juice that is dehydrated, and retaining its natural minerals & enzymes, making it lower glycemic and more nutritious than refined sugars. Use cup for cup in place of refined sugar. Readily available at your local bulk foods or natural foods store.
**Coconut Sugar = unrefined natural dried sweetener from the coconut palm. It is high in nutrients and amino acids also making it a sustainable low glycemic choice. Use cup for cup to replace refined sugars. Also available at your local bulk foods or natural foods store.
PREPARATION METHOD:
Combine all ingredients in a large heavy pan. (Omit cloves if you plan to freeze mincemeat.) Cook mixture slowly until it is tender and thick, about 1 hour or more. Stir frequently to prevent sticking.
To can, pour boiling mixture into hot, sterile jars, leaving 1/2-inch headspace; seal promptly. Process in a boiling water bath for 20 minutes. Store in a cool dry place.
To freeze, pack cooled mixture into freezer jars or containers, leaving about an inch headspace for expansion. Seal and freeze promptly.
Makes about 5 to 6 quarts. Enough for several pies and tarts. See BAKING category for alternative pie & tart shell recipes.
-
You are currently browsing the archives for the Preserving & Canning category.
Blogs I Follow


